
Recently, Microsoft unveiled their latest offering: Intune Enterprise App Management. However, upon closer examination, you’ll discover that it functions as an add-on—even for M365 E5 subscribers. As someone who anticipated this development (thanks to a roundtable discussion), I had already achieved similar results using Winget, the built-in Microsoft software management tool, well before the official announcement.
Install Winget on a System Context
The first step to making everything work seamlessly is installing Winget on the System context. This will allow Winget to install apps globally for all users, even before a device actually gets assigned to an end user.
Step 1 - Obtain the Winget MSIX bundle packages
The first step is to download the latest release of Winget (App Installer) MSIX bundle package and it's dependencies. This can be done by going to https://store.rg-adguard.net/ and then searching for the package via Package Name: Microsoft.DesktopAppInstaller_8wekyb3d8bbwe
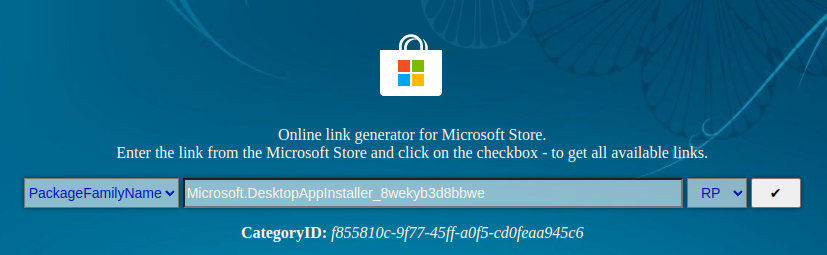
Once you've searched for the item, you will notice a long list of files. You will need the following files:
Microsoft.DesktopAppInstaller_<version>_neutral_~_8wekyb3d8bbwe.msixbundleMicrosoft.UI.Xaml.2.7_<version>x648wekyb3d8bbwe.AppxMicrosoft.VCLibs.140.00.UWPDesktop_<version>x64_8wekyb3d8bbwe.Appx
Step 2 - Create the install PowerShell script
Create a file called install.ps1 and then copy the following contents in:
Add-ProvisionedAppxPackage -online -PackagePath:.\Microsoft.DesktopAppInstaller_<version>__8wekyb3d8bbwe.msixbundle -DependencyPackagePath .\Microsoft.VCLibs.140.00.UWPDesktop_<version>_x64__8wekyb3d8bbwe.Appx,.\Microsoft.UI.Xaml.2.7_<version>_x64__8wekyb3d8bbwe.Appx -SkipLicenseThis script runs the ProvisionedAppXPackage command to install the App Installer Package which in turn installs Winget.
Make sure to replace <version> with your version numbers. I also recommend renaming the DesktopAppInstall bundle to remove the tilde character if needed.
Step 3 - Create a detection PowerShell script
In order for Intune to know that everything was installed successfully we need a detection script. For that create a detect.ps1 file. And insert the following contents:
$ResolveWingetPath = Resolve-Path "C:\Program Files\WindowsApps\Microsoft.DesktopAppInstaller_*_x64__8wekyb3d8bbwe\winget.exe"
    if ($ResolveWingetPath){
           $WingetPath = $ResolveWingetPath[-1].Path
    }
$wingetexe = $ResolveWingetPath

if (Test-path $wingetexe)
{ Write-host "Found Winget"}
This script checks the global system context install path for apps to check that Winget got installed. It is version independent.
Step 4 - Create an uninstall PowerShell script
In order to satisfy Intune requirements we need to add an uninstall script as well. For this file create a uninstall.ps1 file. And then insert the following contents:
Remove-AppPackage -Package "Microsoft.DesktopAppInstaller"This script runs the Remove-AppPackge command to remove the App Installer package for uninstalling Winget.
Step 5 - Package it for Intune
From here you should have a folder with the contents that looks something like this:
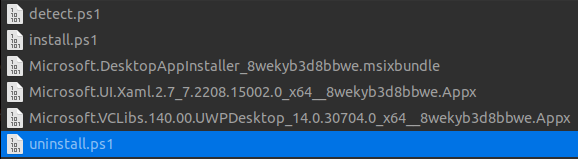
So now we just need to package everything up in the Intune format using the Microsoft Win32 Content Prep Tool (note this is a Windows only tool)
To package the apps run the following command:
.\IntuneWinAppUtil.exe -c C:\Path\To\WingetSetup\Folder -s install.ps1 -o C:\Path\To\OutputThis is the Intune package app, -c specifies the source folder, -s the "setup" file, and -o the output directory for the .intunewin file.
Step 6 - Upload to Intune
Now we just upload the application to Intune. For the name I used Winget Package Manager however you can use whatever name you wish.
%SystemRoot%\sysnative\WindowsPowerShell\v1.0\powershell.exe -windowstyle hidden -executionpolicy bypass -command .\install.ps1For the uninstall command use:
%SystemRoot%\sysnative\WindowsPowerShell\v1.0\powershell.exe -windowstyle hidden -executionpolicy bypass -command .\uninstall.ps1For the install time the default of 60 minutes is more than enough (it should actually only take about 2 minutes in my experience)
For the detection section: Select the custom script option, and then upload the detect.ps1 file.
Install Applications
Alright, we now have winget installed in the system context, now we have to actually allow users to install apps!
Now there are two ways to do this, the first one is incredibly easy and uses a GUI that you can find on Github. This method connects to Intune for you, creates an Intune package from the required scripts, and then uploads it and sets it up for you. From there you just have to go into Intune and assign it to users and set it's dependency on the Winget package we previously created.
The second method is a little harder (because we package things for Intune ourselves) but it's also stupidly simple.
Step 1 - Download the repo
Because someone already created a repo with the relevant scripts that are really good there is no point in re-created them. You can download the repo from: https://github.com/Romanitho/Winget-Install using either git directly, or downloading the ZIP.
In addition to the scripts already existing, these scripts also support mods while allows you to customize the installation of Winget packages, fire webhooks, etc. While this guide doesn't go into details on making those mods, the repo has a decent readme on that functionality in the mods folder.
Step 2 - Turn the folder into an Intune format
Using the same method as before for Winget:
.\IntuneWinAppUtil.exe -c C:\Path\To\Repo\Folder -s wingetinstall.ps1 -o C:\Path\To\OutputStep 3 - Upload to Intune and install apps
Now that you have the intune formatted package, create a new win32 app in Intune (lets' say Notepad++), and upload this intune package as the installer.
"%systemroot%\sysnative\WindowsPowerShell\v1.0\powershell.exe" -NoProfile -ExecutionPolicy Bypass -File winget-install.ps1 -AppIDs Notepad++.Notepad++
Runs powershell silently and runs the winget-install.ps1 command and passes through the Winget App ID
Then for the uninstall section use the following:
powershell.exe -ExecutionPolicy bypass -File winget-install.ps1 -AppIDs Notepad++.Notepad++ -Uninstall
And finally, for detection, replace the $AppToDetect variable value with the app ID (Notepad++.Notepad++) so it should look like $AppToDetect = "Notepad++.Notepad++" and then upload the detect.ps1 file.
Auto-Update Applications
For automatic updates we are once again going to use an amazing tool and repository written by Romanitho. This time the amazing Winget-AutoUpdate repository.
This will let us define a time in which Winget should upgrade apps automatically on all endpoints across the organization. Which allows us to patch security issues seamlessly for end users, while also not having to create new versions in Intune all the time.
Step 1 - Download the repository
Once again, you can download the repository via git directly, or download the zip file.
Step 2 - Convert to Intune package
Once again we will use the Intune packaging tool to convert this folder to a Intune package.
.\IntuneWinAppUtil.exe -c C:\Path\To\Repo\Folder -s wingetinstall.ps1 -o C:\Path\To\OutputStep 3 - Upload to Intune
Once again create an Intune win32 app, (I called mine Winget Auto Update), and upload the Intune package we just created.
From here we need to define the install, uninstall and detection methods. For the installation command use the following:
"%systemroot%\sysnative\WindowsPowerShell\v1.0\powershell.exe" -noprofile -executionpolicy bypass -file "Winget-AutoUpdate-Install.ps1" -Silent -NotificationLevel SuccessOnly -DoNotUpdate -RunOnMetered -UpdatesAtLogonRuns the Install script with options to only show notifications to users on successful updates, silently install, and force run on metered connections, and run the updates on login. Review the readme for all install options.
If you need to ignore certain packages from being updates, I highly recommend that you host the excluded_apps.txt file in some public place. This can be a github, gitlab, bitbucket, etc. repository with a raw file link, or a public website. The important thing however is that WAU must be able to read it from a directory. Your install command would then look something like this:
"%systemroot%\sysnative\WindowsPowerShell\v1.0\powershell.exe" -noprofile -executionpolicy bypass -file "Winget-AutoUpdate-Install.ps1" -Silent -NotificationLevel SuccessOnly -DoNotUpdate -RunOnMetered -UpdatesAtLogon -ListPath https://company.tld/wau/Note that the excluded_apps.txt file is not actually defined, only directory under which the file exists
Now for the install command you'll want to use:
"%systemroot%\sysnative\WindowsPowerShell\v1.0\powershell.exe" -noprofile -executionpolicy bypass -file "C:\ProgramData\Winget-AutoUpdate\WAU-Uninstall.ps1"And finally for the detection side of things, set the rules to manual. Then add a file ruletype, set the path to C:\ProgramData\Winget-AutoUpdate and then User-Run.ps1 for the file or folder input, and then for detection method select "File or folder exists"
Final Notes
While I love the concept of the Intune Enterprise App Management and what it can do, I hate the idea of paying Microsoft even more money for a feature that at the bare minimum should be included in E5 (after all why else are we paying them so damn much money). Especially when that feature can essentially be replicated via free tooling like Winget (or Chocolatey). While I can't replicate the reporting functionality yet, it's also kind of somewhat built in just by looking at device app lists.

